
Trong bài viết này chúng ta sẽ tìm hiểu về animation css trong React.
Step-1: Cài đặt React CSS Transitions Group
Đây là một React add-on phổ biến cho việc tạo CSS transitions và animations. Chúng ta sẽ cài đặt nó từ command prompt của window.
C:\Users\username\Desktop\reactApp>npm install react-addons-css-transition-group
Step-2: Tạo CSS file
Hãy tạo 1 thư mục css trong thư mục public và tạo 1file style.css trong thư mục đó. Đừng quên link nó vào head trong index.html
<link rel = "stylesheet" type = "text/css" href = "css/style.css">
Step-3: Appear animation.
Chúng ta sẽ tạo 1 React component cơ bản. Thẻ ReactCSSTransitionGroup được sử dụng để bao cái thằng component mà ta muốn nó animate.
App.js
transitionAppearTimeout = {500} thời gian xuất hiện giống trong css transition bình thường.
Index.js
css/style.css
App.js
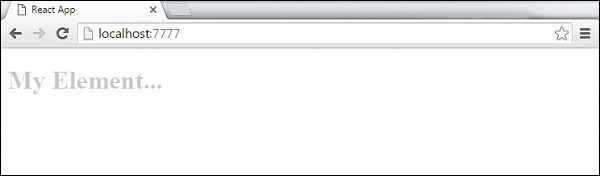
import React from 'react';
var ReactCSSTransitionGroup = require('react-addons-css-transition-group');

class App extends React.Component {
   render() {
      return (
         <div>
            <ReactCSSTransitionGroup transitionName = "example"
               transitionAppear = {true} transitionAppearTimeout = {500}
               >

               <h1>My Element...</h1>
            </ReactCSSTransitionGroup>
         </div>
      );
   }
}
export default App;
transitionAppear = {true} khởi tạo transition ngay khi component start Mount ( các bạn xem bài này để hiểu về vòng đời của component trong React: Bài 7: ReactJS - Tìm hiểu về Component Life Cycle, transitionAppear sẽ khởi tạo lúc componentWillMount).
transitionAppearTimeout = {500} thời gian xuất hiện giống trong css transition bình thường.
Index.js
import React from 'react'
import ReactDOM from 'react-dom';
import App from './App.jsx';

ReactDOM.render(<App />, document.getElementById('app'));
css/style.css
.example-appear {
   opacity: 0.01;
}
.example-appear.example-appear-active {
   opacity: 1;
   transition: opacity 500ms ease-in;
}
Khi chạy project ta sẽ thấy component từ từ xuất hiện Fade in.
Step 4 - Enter and Leave Animations
Chúng ta sẽ sử dụng Enter and Leave Animations để add và remove phần tử trong list component.
App.js
import React from 'react';
var ReactCSSTransitionGroup = require('react-addons-css-transition-group');

class App extends React.Component {
   constructor(props) {
      super(props);

      this.state = {
         items: ['Item 1...', 'Item 2...', 'Item 3...', 'Item 4...']
      }
      this.handleAdd = this.handleAdd.bind(this);
   };
   handleAdd() {
      var newItems = this.state.items.concat([prompt('Create New Item')]);
      this.setState({items: newItems});
   }
   handleRemove(i) {
      var newItems = this.state.items.slice();
      newItems.splice(i, 1);
      this.setState({items: newItems});
   }
   render() {
      var items = this.state.items.map(function(item, i) {
         return (
            <div key = {item} onClick = {this.handleRemove.bind(this, i)}>
               {item}
            </div>
         );
      }.bind(this));

      return (
         <div>
            <button onClick = {this.handleAdd}>Add Item</button>

            <ReactCSSTransitionGroup transitionName = "example"
               transitionEnterTimeout = {500} transitionLeaveTimeout = {500}>
               {items}
            </ReactCSSTransitionGroup>
         </div>
      );
   }
}
export default App;
import React from 'react'
import ReactDOM from 'react-dom';
import App from './App.jsx';

ReactDOM.render(<App />, document.getElementById('app'));
CSS/style.css
.example-enter {
   opacity: 0.01;
}
.example-enter.example-enter-active {
   opacity: 1;
   transition: opacity 500ms ease-in;
}
.example-leave {
   opacity: 1;
}
.example-leave.example-leave-active {
   opacity: 0.01;
   transition: opacity 500ms ease-in;
}
Khi chúng ta chạy chương trình và nhấn button Add Item kết quả ta được:
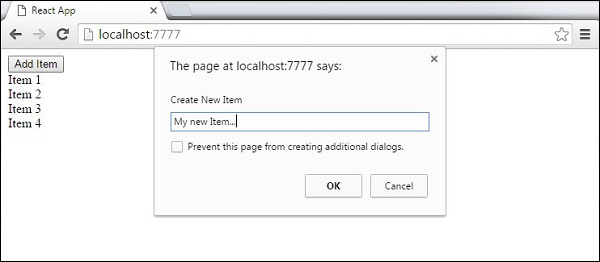
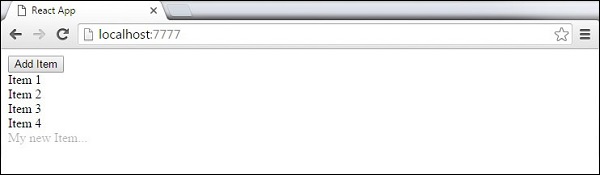
Khi ta click ok hoặc nhấn enter 1 phần tử mới sẽ xuất hiện từ từ
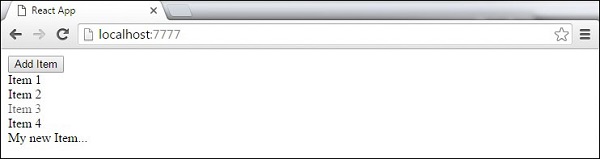
Khi ta xóa 1 item khi click vào nó, như Item 3 trong ví dụ, phần tử sẽ từ từ biến mất.
Mong những bài viết tiếp từ anh, hi vọng sau khi xong những bài hướng dẫn cơ bản sẽ có những hướng dẫn bài tập thực hành, hoặc áp dụng react js vào xây dựng những ứng dụng thực tế. Cảm ơn anh!
Trả lờiXóaCảm ơn comment của bạn, comment của bạn góp phần tạo nên động lực để mình tiếp tục xây dựng blog.
XóaNhững bài viết của anh rất dễ hiểu và dễ học.cảm ơn anh rất nhiều!
Trả lờiXóa